Razorpay x ONBBITS Integration: Accept Payments Directly on WhatsApp
Connect your Razorpay account to ONBBITS and turn WhatsApp into a complete sales channel. Customers receive an order summary and a secure payment link in chat, pay by Cards, UPI, NetBanking or Wallets, and get an automatic receipt as soon as Razorpay confirms the payment.
What You Can Do with This Integration
Before You Begin
Make sure you have the following ready:
- An active ONBBITS account with a connected WhatsApp Business number.
- A Razorpay account with access to the Razorpay Dashboard (API Keys section).
Step 1: Connect Razorpay in ONBBITS
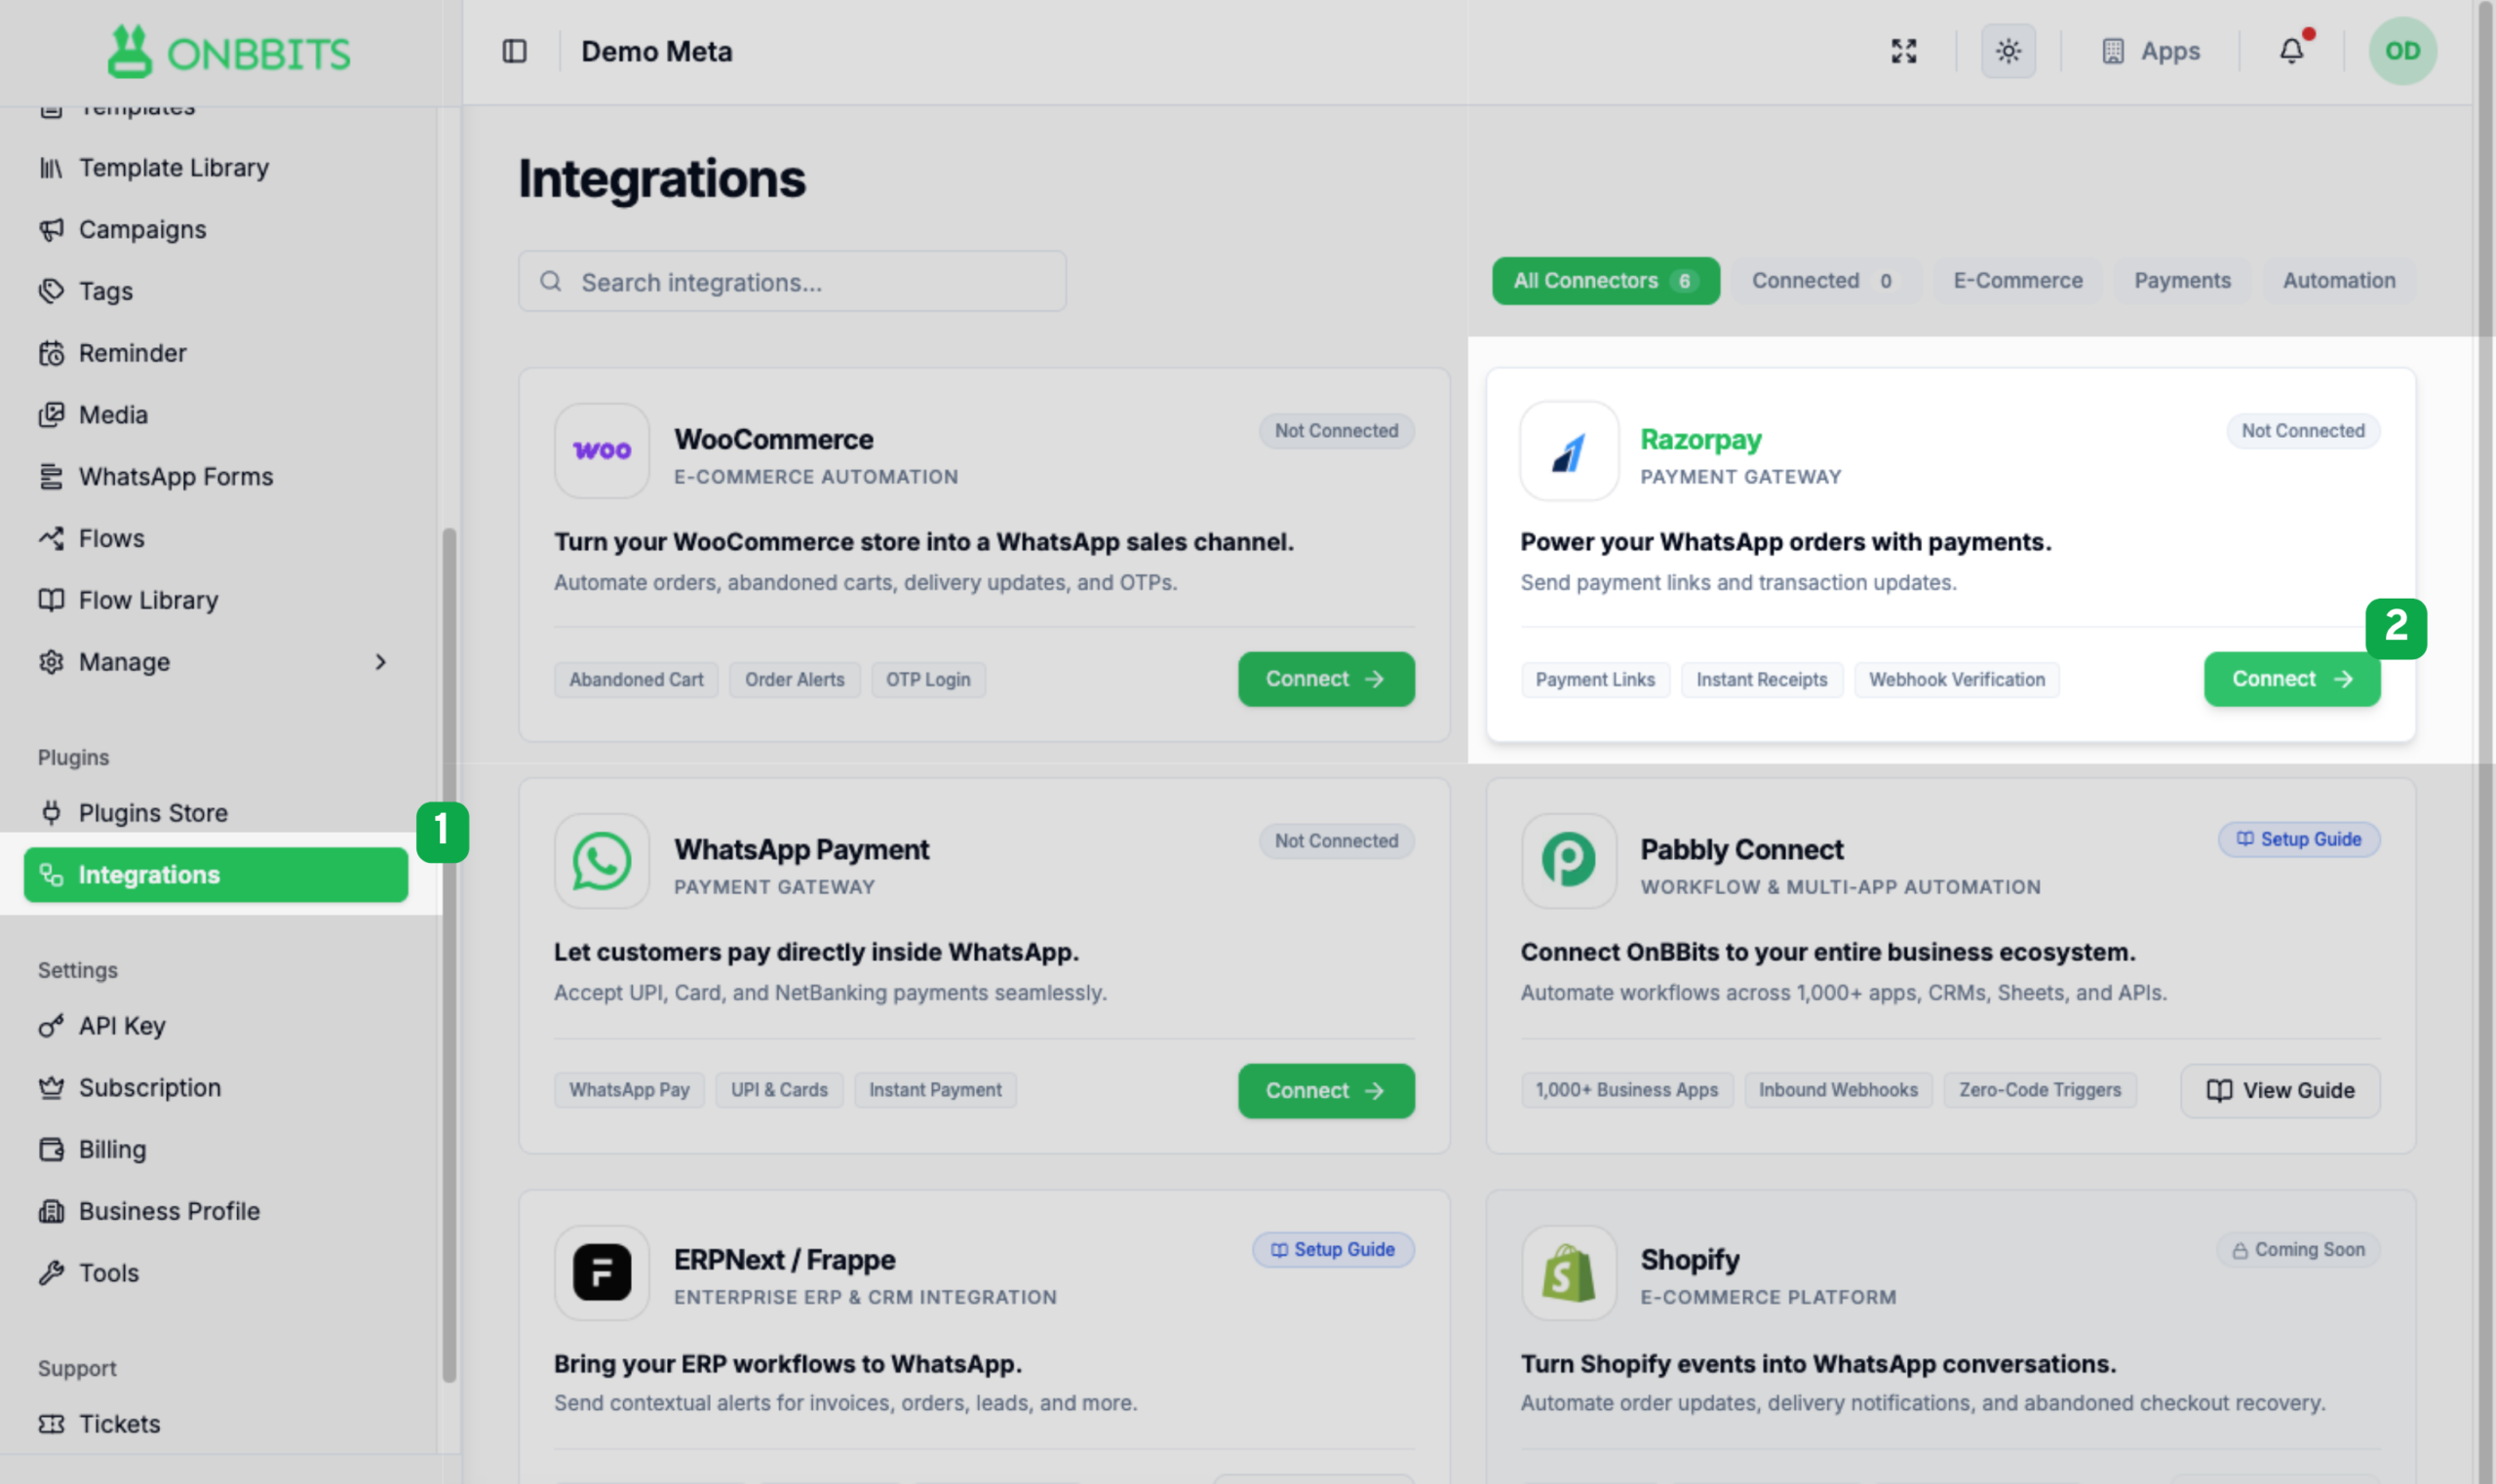
- In the ONBBITS left sidebar, open Plugins > Integrations.
- Find the Razorpay card (Payment Gateway) and click Connect.
- On the Razorpay Integration page, you will see the status Not Connected until setup is complete.
Step 2: Add Your Razorpay API Credentials
- Log in to your Razorpay Dashboard and open the API Keys page. The page in ONBBITS links directly to it.
- Copy your Key ID (it looks like rzp_live_xxxxxxxxxxxxxxxx).
- Copy your Key Secret.
- Back in ONBBITS, paste the Key ID and Key Secret into the matching fields. Use the eye icon to show or hide the secret while typing.
- Click Save Credentials.
Step 3: Webhook Setup
Webhooks keep your order and payment statuses synced instantly between Razorpay and ONBBITS.
Automatic registration: When you save your credentials, ONBBITS automatically registers the webhook in your Razorpay account. In most cases you do not need to do anything.
Your webhook URL:
https://api.onbbits.io/webhooks/razorpay/commerce
Use the Copy URL button on the Razorpay Integration page to copy it.
Manual setup (only if needed): If automatic registration fails, or you simply want to verify it, expand How to manually configure the Webhook in Razorpay on the same page and follow the instructions. You will add the URL above as a webhook endpoint in your Razorpay Dashboard.
Step 4: Select Razorpay as Your Checkout Gateway
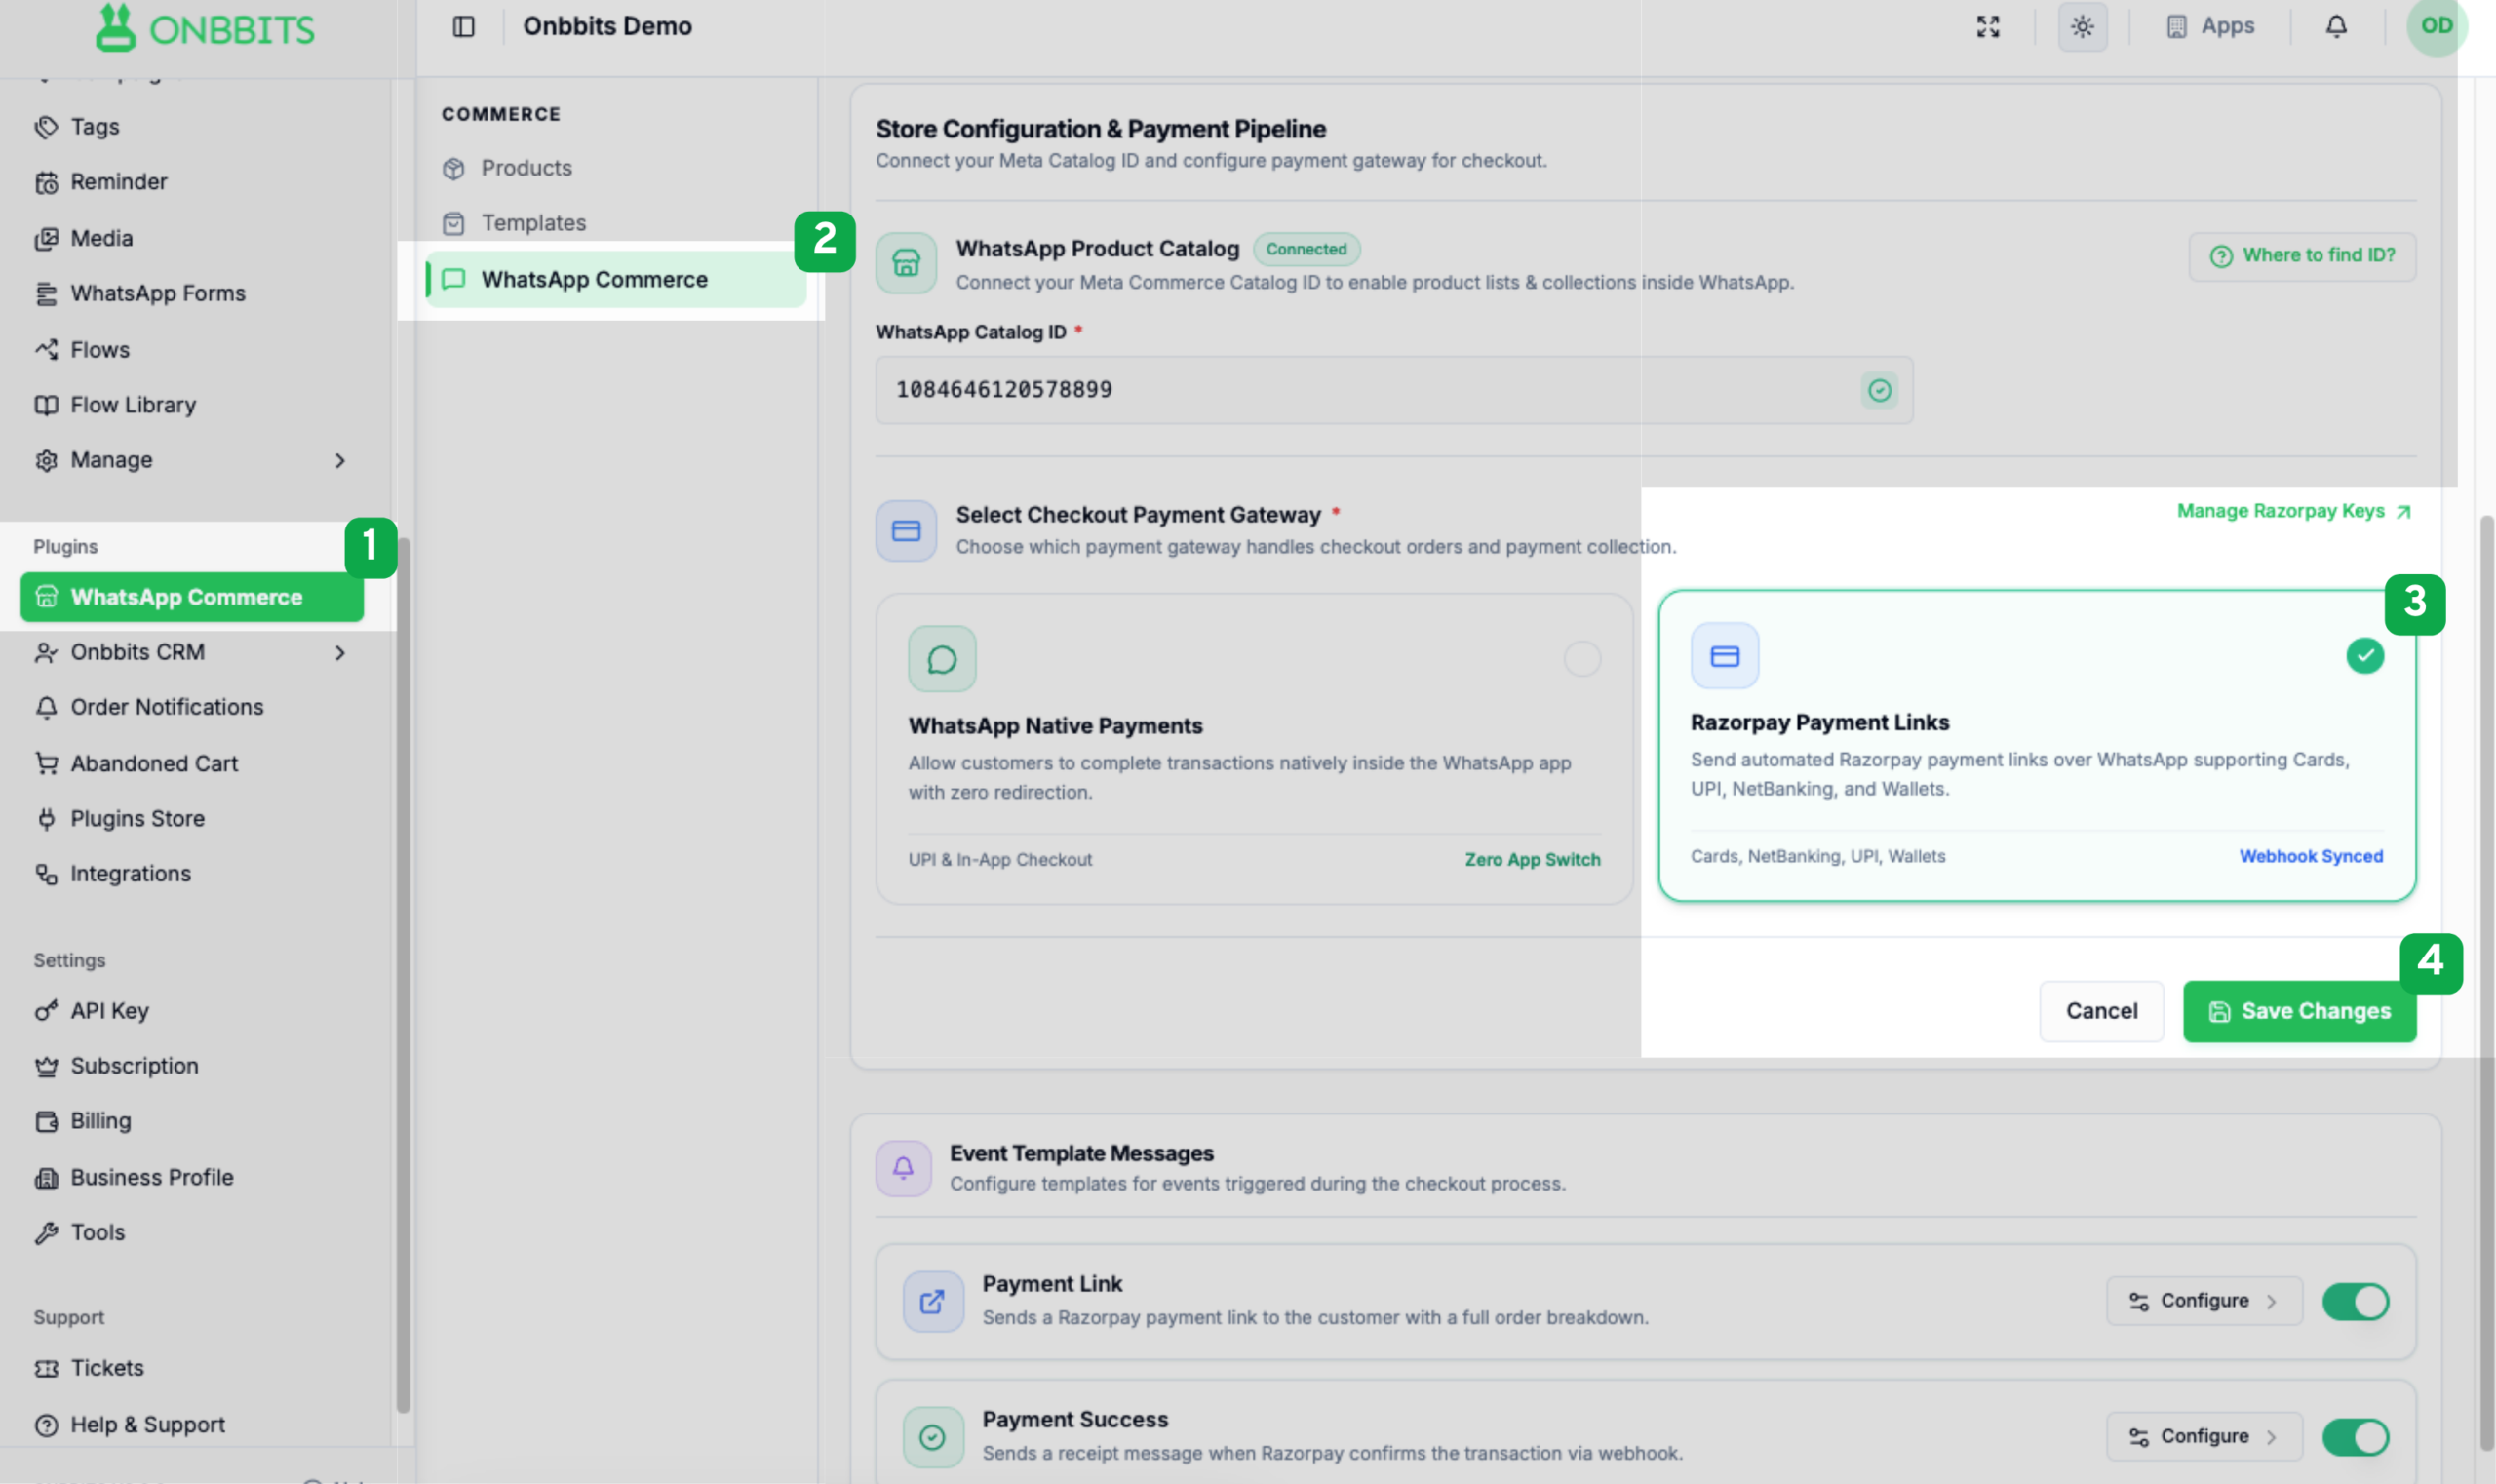
- Under Select Checkout Payment Gateway, choose:
- Razorpay Payment Links: automated Razorpay payment links sent over WhatsApp, supporting Cards, UPI, NetBanking and Wallets.
- Select Razorpay Payment Links. Once your webhook is registered, it shows Webhook Synced.
- Click Save Changes.
Need to update your keys later? Click Manage Razorpay Keys at the top of this section.
Step 5: Configure the Payment Request Template
This is the message customers receive when a payment request is created.
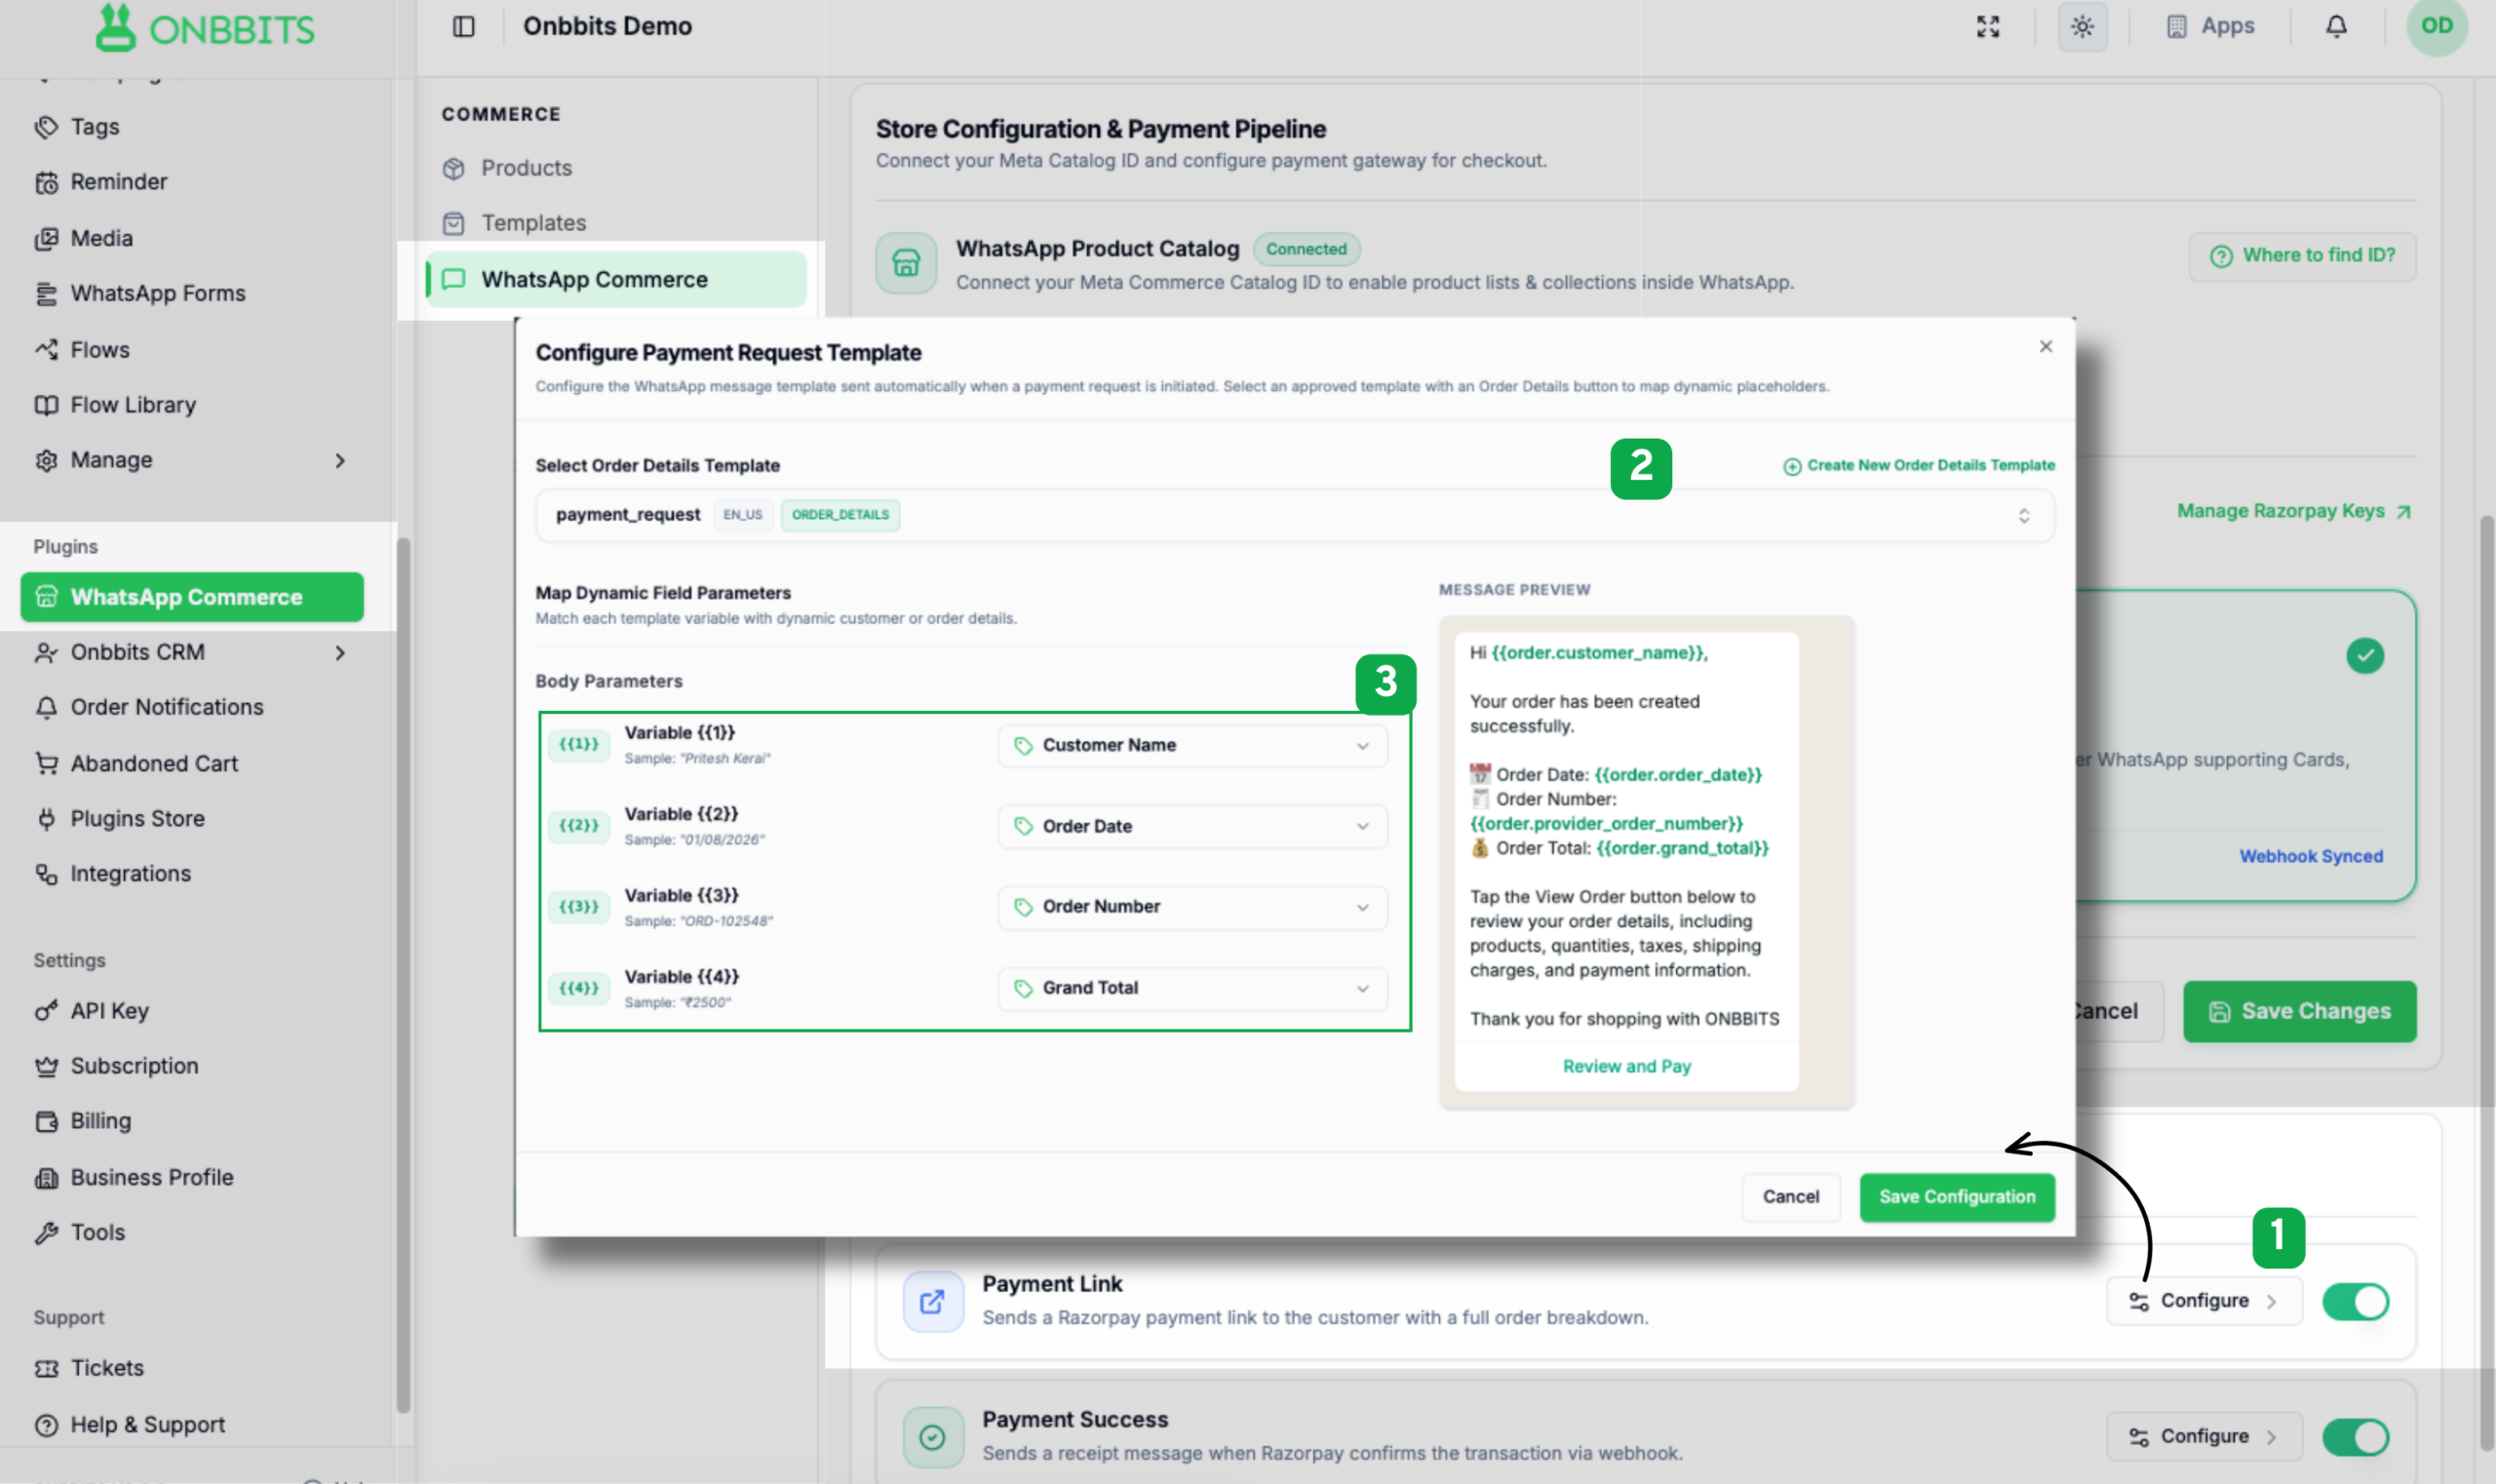
- On the WhatsApp Commerce page, scroll to Event Template Messages.
- Next to Payment Link, make sure the toggle is on and click Configure.
- In Select Order Details Template, choose an approved template with an Order Details button (for example, payment_request, language EN_US, category ORDER_DETAILS). No template yet? Click Create New Order Details Template.
- Under Map Dynamic Field Parameters, match each template variable to order data:
| Template variable |
Maps to |
| {{1}} |
Customer Name |
| {{2}} |
Order Date |
| {{3}} |
Order Number |
| {{4}} |
Grand Total |
- Check the Message Preview on the right. The customer sees a greeting, order date, order number and order total, followed by a Review and Pay button.
- Click Save Configuration.
Step 6: Configure the Payment Success Template
This receipt is sent automatically when Razorpay confirms the payment through the webhook.
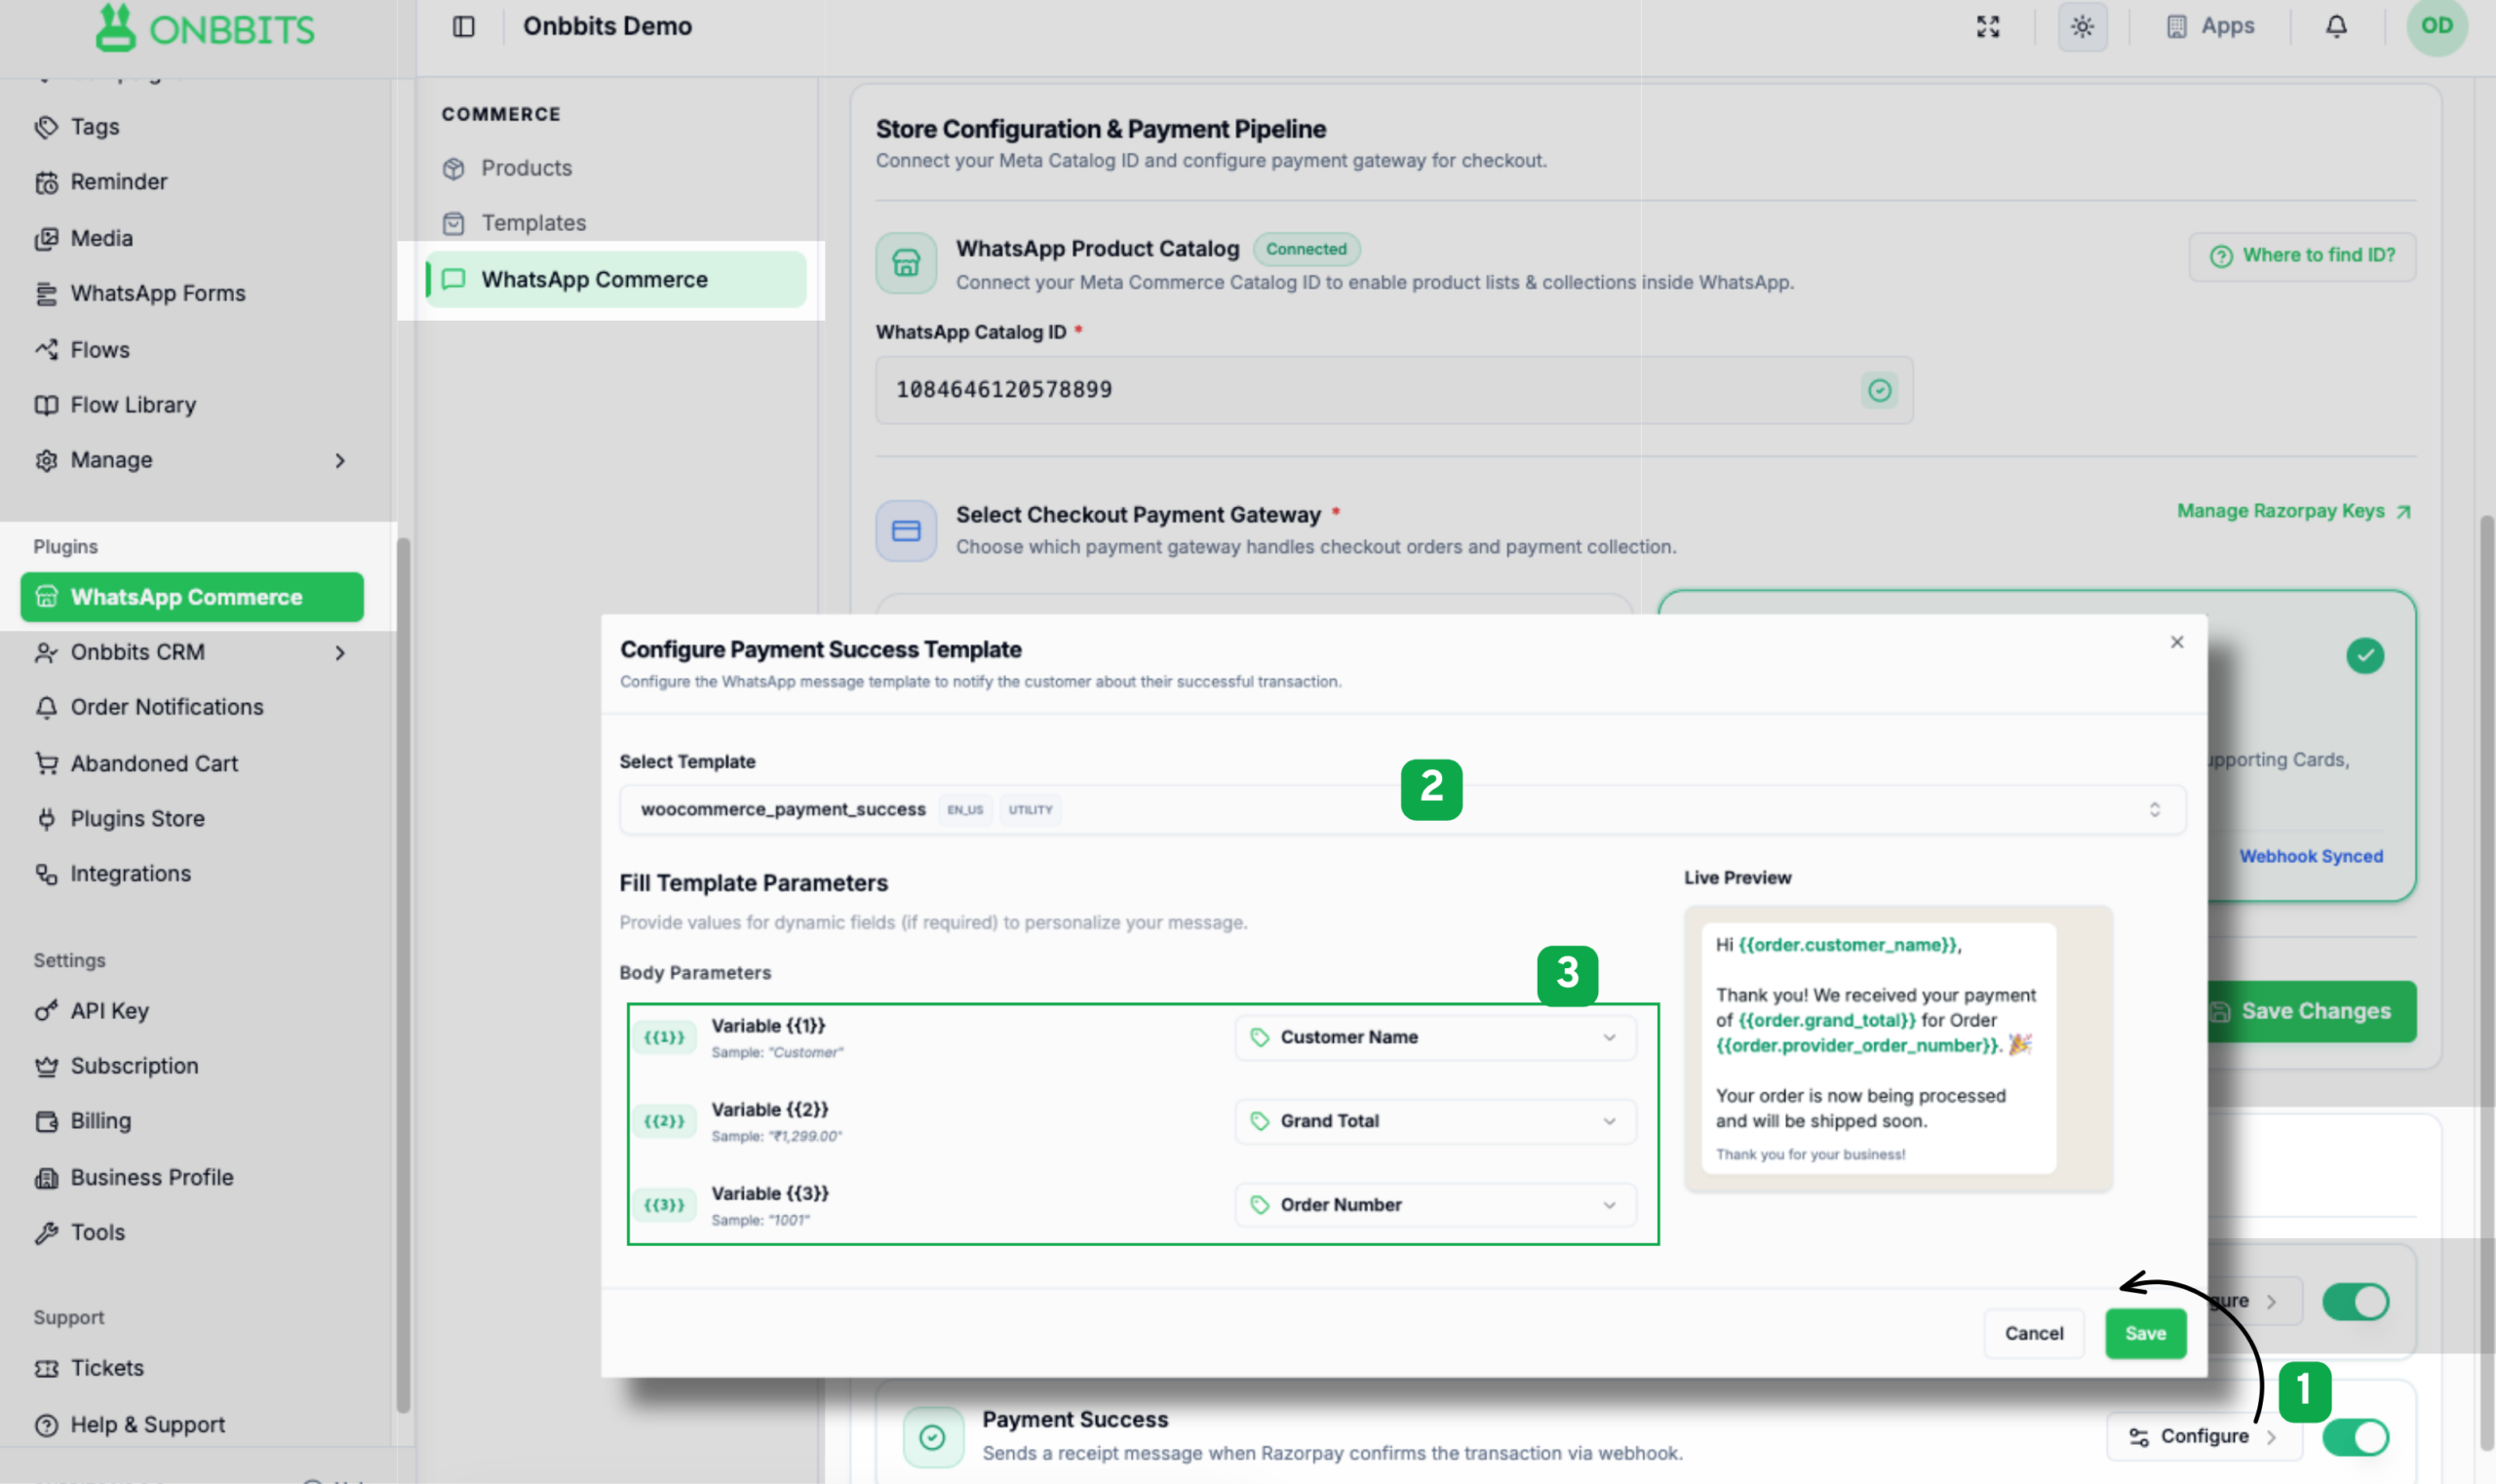
- Under Event Template Messages, next to Payment Success, make sure the toggle is on and click Configure.
- In Select Template, choose an approved utility template (for example, woocommerce_payment_success, language EN_US, category UTILITY).
- Map the body parameters:
| Template variable | Maps to |
|---|
| {{1}} | Customer Name |
| {{2}} | Grand Total |
| {{3}} | Order Number |
- Review the Live Preview. Customers see a thank-you message confirming the amount received for their order and that it is being processed.
- Click Save.
How the Payment Flow Works
- A customer places an order through your WhatsApp catalog or store.
- ONBBITS creates the order and sends the Payment Request template with a Review and Pay button.
- The customer opens the Razorpay payment link and pays using Cards, UPI, NetBanking or a Wallet.
- Razorpay confirms the payment to ONBBITS through the webhook.
- ONBBITS updates the order status and sends the Payment Success receipt on WhatsApp.
Test Your Setup
- Use Razorpay test keys and place a test order.
- Confirm the payment request arrives on WhatsApp with the correct name, date, order number and total.
- Complete a test payment and confirm the success message arrives.
- Check that the order status updates in ONBBITS.
- Switch to live keys when everything works as expected.
Troubleshooting
Status still shows Not Connected. Re-check the Key ID and Key Secret for typos or extra spaces, then click Save Credentials again.
Webhook is not synced. Automatic registration may have failed. Copy the webhook URL and add it manually in your Razorpay Dashboard, following the manual configuration guide on the integration page.
Payment succeeded but no receipt was sent. Confirm the Payment Success toggle is on, a template is selected and saved, and the webhook is active.
Payment request template is not listed. The template must be approved by Meta and include an Order Details button. Create one with Create New Order Details Template and wait for approval.
Variables show wrong values. Reopen the template configuration and check that each variable is mapped to the correct field.
Frequently Asked Questions
Related Articles